Deep Cleaning Laminate Floors: A Safe Step-by-Step Guide
A laminate floor is a photograph in a sealed package. The grain you see is a printed image, the sheen is a thin resin wear layer, and beneath both sits a fiberboard core that swells the moment water reaches it. Deep cleaning a floor built this way has almost nothing to do with scrubbing power. The floors that fail are rarely the dirty ones. They're the ones wiped too wet, twice a week, for three years.
That matters in West Georgia, where a Kennesaw entryway collects red clay from the yard in March and a coat of yellow pollen in April, and where an Acworth kitchen stays muggy from June through September. Grit and humidity test a laminate floor from opposite directions, and both are answered by the same principle. Lift the soil mechanically, then touch the surface with as little liquid as the job allows.
Everything that follows serves that rule. Check the product paperwork before you buy a cleaner, build a small kit, work in an order that keeps water away from the seams, and learn to tell a dull patch that's soil from one that's damage.
Table of Contents
- Tools and Supplies That Suit Laminate
- Deep Clean Laminate Floors in Six Steps
- Why Moisture Control Matters More Than the Cleaner
- Methods to Avoid and When Water-Resistant Floors Differ
- Diagnose Dull, Sticky or Swollen Laminate First
- Book a Free Estimate for Your Laminate Floors
Tools and Supplies That Suit Laminate
A laminate deep clean runs on a short list of tools, and the list is short because this floor punishes generosity. Every extra drop of water and every extra ounce of pressure raises the odds of harm to a surface that can't be refinished. The EN 13329 standard that governs this category tests abrasion resistance, impact, stains, scratches and edge swelling precisely because the pattern you see sits under a thin resin surface. Stiff brushes, scouring powders and gritty pads wear that film down while the core underneath stays perfectly sound. You're protecting a finish, not scouring tile.
Laminate cleaning kit by job
| Tool or product | Job it does | Why it suits laminate |
|---|---|---|
| Hard-floor vacuum, beater bar off | Lifts grit before any moisture | Stops grit from scratching the wear layer |
| Dust mop or soft broom | Removes dust, pet hair and loose debris | Adds no moisture to seams |
| Microfiber mop head, well wrung | Damp wipe-down in small sections | Holds little water and can be swapped when soiled |
| Microfiber cloth | Pre-treats sticky spots | Lets you control moisture on one spot |
| Manufacturer-approved or pH-neutral laminate cleaner | Loosens film and sticky soil at label dilution | Low residue; no bleach, ammonia or wax |
| Hygrometer | Shows indoor relative humidity | Helps you judge whether the room suits the floor |
Assemble the kit before you start, not halfway through with a damp floor behind you. Two or three mop heads and a stack of cloths matter more than people expect, because the moment a head turns grey it starts smearing soil instead of lifting it.
- Rinse often, swap early. A head that has already crossed a gritty entryway is a scrub pad in disguise. Change it before it carries grit into the next room.
- Leave the bucket in the closet. The cleaner goes onto the mop head at label dilution, so a bucket of solution tempts you into dipping and flooding.
- Keep a hygrometer on the shelf. This inexpensive gauge reads the room's relative humidity, which tells you whether conditions favor a damp pass or a dry one.
The kit deliberately leaves out scouring powder, steel wool, abrasive pads and strong degreasers. Each one removes soil and finish at the same time. Cleaner choice also matters more than expected, and the guide to choosing soap for the floor explains how a soapy mix leaves a film on a smooth wear layer. The six steps below put every item in this kit to work in order.
Deep Clean Laminate Floors in Six Steps
A good deep clean leaves laminate barely damp, not wet. The European Producers of Laminate Flooring bulletin on professional cleaning recommends a “moist wipe down” with a cleaner approved for the specific floor. Follow the manufacturer's care instructions, since excess water can contribute to swelling, warping, delamination or separated joints, and may affect warranty coverage.
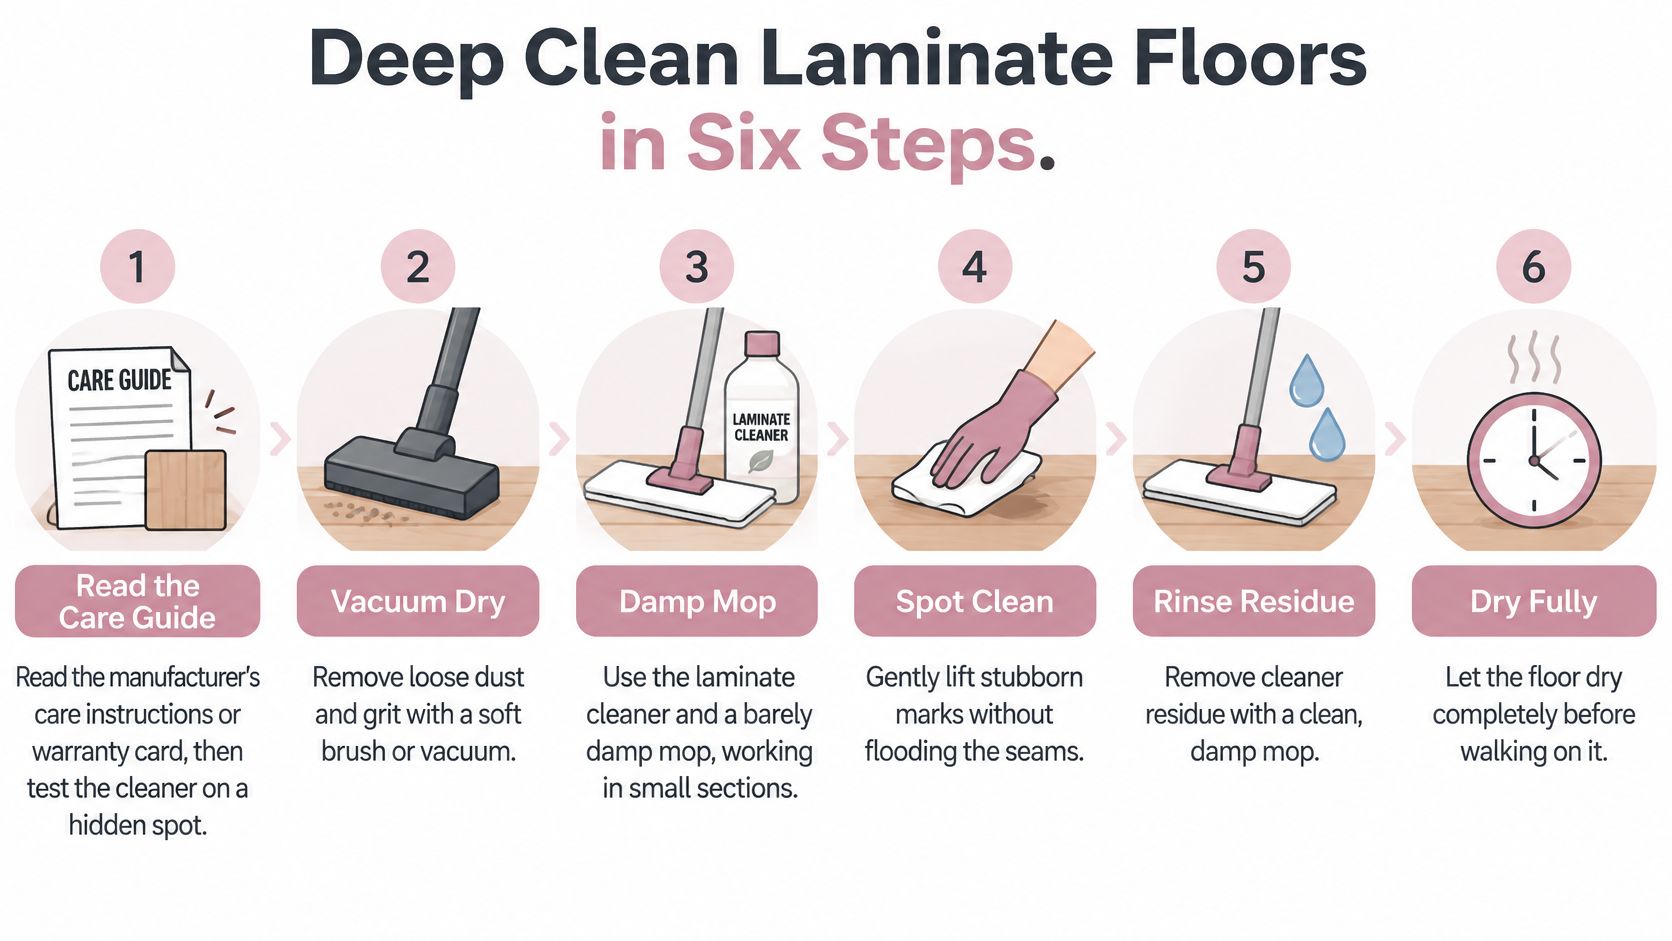
1. Check the care instructions and test the cleaner. Read the floor manufacturer's cleaning guidance and warranty paperwork. Test a small amount of the approved cleaner in a hidden spot, then let it dry fully. If it leaves a streak or sticky film, do not use it across the room.
2. Remove loose grit. Vacuum with a hard-floor attachment and the beater bar off, or use a dust mop. Grit dragged beneath a damp mop can scratch the wear layer. In Georgia homes, dirt tracked in from outdoors can leave fine scratch trails if it is not removed first.
3. Spot-treat sticky marks. Hold a barely damp microfiber cloth against food residue or adhesive. Press, wait a few seconds, then lift the mark. Avoid circular scrubbing, which can spread soil and add friction.
4. Put cleaner on the cloth or mop head. Do not spray it directly onto the floor. Applying the product to the cleaning head makes it easier to control the amount and keeps liquid from pooling near the joints.
5. Mop a small area at a time. Wring the mop well and work along the plank direction. Change or rinse the head when it turns grey, and avoid walking back over a damp section to reach another area.
6. Dry the floor promptly. Use a clean, dry microfiber head to pick up visible moisture and cleaner residue. Let the floor dry before walking on it.
A “moist wipe down” should leave the surface barely cool to the touch, not visibly wet. If you see a sheen of liquid, use less moisture.
Room conditions matter, too. The EPLF bulletin gives a favorable indoor range of 40–70% relative humidity and 18–25°C. Use a hygrometer to monitor humidity rather than guessing. For floors installed with adhesive, the bulletin advises against intensive cleaning and heavy foot traffic while the adhesive dries. That period is at least 12 hours for some installations. This guide to avoiding water damage on laminate also explains how to limit moisture during cleaning.
Stop if the floor stays wet at the seams, develops dark edges, or feels damp underfoot. A successful clean leaves no visible moisture or streaks and no reason to make another wet pass.
Why Moisture Control Matters More Than the Cleaner
Cleaning chemistry gets all the attention, and construction decides the outcome. An account of how laminate flooring came to market describes resin-impregnated decorative paper fused to fiberboard, a build that puts a printed image and a protective surface over a core that behaves like a sponge at the edges. Liquid that reaches a seam or a perimeter gap doesn't sit politely on top. It wicks into the core, and the plank lifts, crowns or separates.
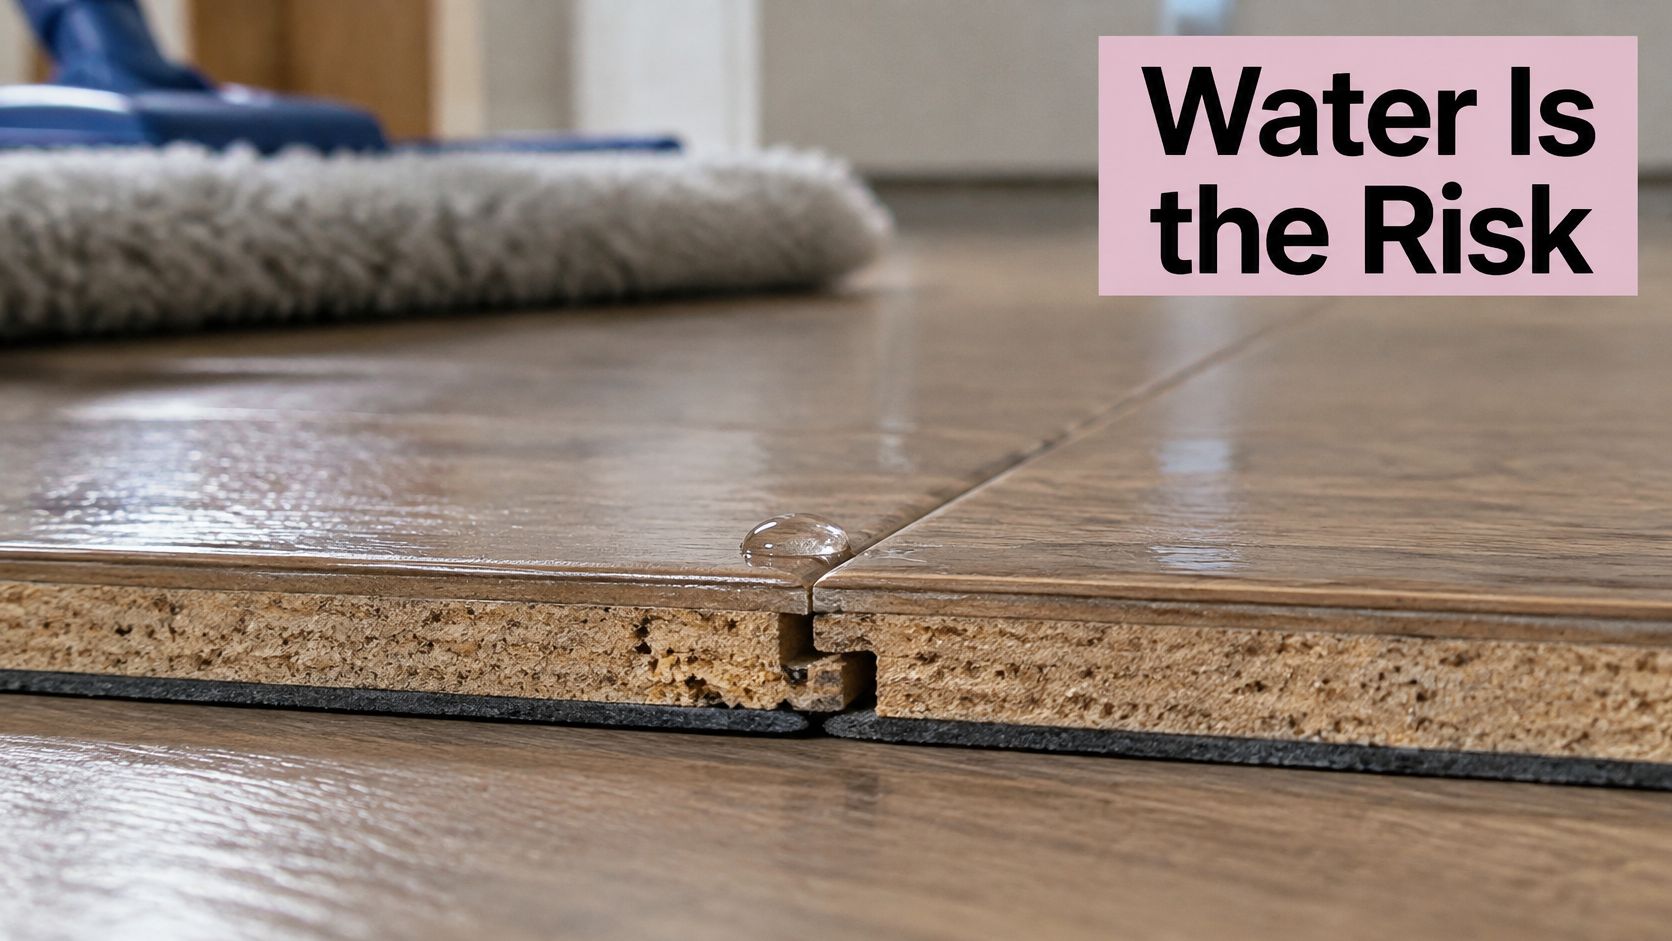
That's the difference between laminate and a wood floor you can rescue. A spill that marks hardwood is often a sanding job away from disappearing, as this look at dealing with water stains on hardwood floors makes clear. On laminate, the decorative layer and core are factory-bonded, so once the core takes on water the change is permanent. There's no sanding it back.
Georgia gives you two seasons of humidity work. Summer air is heavy and slow to dry a floor, so a mop that would pass in February leaves moisture sitting in the joints in July. Winter heating dries the indoor air instead, and seams can open slightly as planks shrink, which is when those gaps collect dust and crumbs. A hygrometer takes the guesswork out of both, and so does a seasonal adjustment to your routine.
The test: if the floor still looks wet a minute after the pass, the mop was too wet, not the cleaner too weak.
Manufacturer guidance points the same way. Pergo's laminate maintenance leaflet recommends a slightly damp microfiber mop for periodic thorough cleaning and warns that excess water can damage the floor, with remaining moisture removed afterward. A separate 2026 care guide from the same manufacturer notes that many floors should dry within 1–2 minutes and that cleaner belongs on the mop rather than poured or sprayed onto the floor. That drying window is a useful quality check.
Spills get their own rule. Blot, don't wipe. A wiping motion spreads liquid toward the nearest seam, while a blot lifts it off the surface. Follow with a dry cloth, and never leave a puddle sitting near an edge, a transition strip or a baseboard.
Methods to Avoid and When Water-Resistant Floors Differ
Steam can damage laminate even when a floor looks sealed. Manufacturer-focused guidance on steam mopping laminate reports that Shaw advises against steam cleaners on laminate and that Pergo, Shaw and Mohawk recommend dry or slightly damp methods instead. Steam-mop use may also void a flooring warranty. Heat and vapor can force moisture into joints, so greater scrubbing power is no substitute for controlling moisture.
Deep cleaning methods and verdicts
| Method | Verdict | Reason or condition |
|---|---|---|
| Dry vacuum or dust mop | Use every time | Always the first step |
| Lightly damp microfiber mop | Use for routine deep cleaning | Only when the manufacturer allows damp cleaning |
| Wet mop or bucket washing | Avoid | Pushes water into joints and cores |
| Steam mop or steam cleaner | Avoid unless the manufacturer approves | Heat and vapor can force moisture into seams |
| Abrasive pads, scouring powder or rotary scrubber | Avoid | Scratches the wear layer |
| Wax, polish or strong alkaline cleaner | Avoid | Leaves film or damages the finish |
| Water-resistant laminate with a written care guide | Follow the guide | Permitted methods vary by product line |
Standing water, heat and abrasive tools can trade short-term shine for lasting damage to the surface or joints. Wax and polish leave a layer on top of the wear surface that can catch dust and make the floor look cloudy.
Water-resistant does not mean safe for every cleaning method. Product limits vary, so follow the manufacturer's written care guide for how much moisture is allowed and how quickly it must be removed. The guidance for microfiber and cleanability concerns cloths and cleaning, not laminate warranties. Use a microfiber cloth or mop where appropriate, but check the flooring instructions before choosing a method. Some newer lines allow low-setting steam only when their own care guide permits it.
If you do not know the product, check the brand and product line on the plank or in the original paperwork, then read the warranty terms. Choose the least-moist method the guide allows. For help distinguishing water-resistant ranges from ordinary laminate before choosing a floor, consult Nexora Flooring laminate buying advice.
For rentals, move-out cleans and homes where the flooring paperwork is missing, use dry vacuuming and, if needed, a barely damp microfiber mop. Different resilient floors tolerate different methods. For comparison, cleaning linoleum flooring follows different guidance from laminate care.
Diagnose Dull, Sticky or Swollen Laminate First
Most laminate problems don't need a better cleaning recipe. They need a correct diagnosis, because scrubbing harder makes two of the three common complaints worse. Before you mix anything, look at the floor and decide whether you're dealing with soil, residue or damage.
Laminate symptoms, causes and next steps
| Symptom | Likely cause | What to do |
|---|---|---|
| Sticky haze after repeated cleaning | Cleaner or residue buildup | Remove with a barely damp cloth and plain water, and use less product |
| Dull look with no visible dirt | Worn wear layer or film | Cleaning will not restore it; ask a flooring professional about repair options |
| Raised edges, bubbling or swollen seams | Moisture has reached the core | Stop wet cleaning, dry the area and find the water source |
| Dark staining near bathrooms, doors or appliances | Recurring leak or long-term moisture | Check for leaks before deep cleaning |
| Gaps at seams in dry months | Low indoor humidity | Measure humidity with a hygrometer and adjust the room |
| Fine scratches or traffic trails | Grit dragged across the floor | Vacuum first, then use a gentle damp wipe |
Start with the haze, because it's the most common and the most fixable. A floor that feels tacky and looks cloudy after you've cleaned it usually carries a layer of dried product. Plain warm water on a barely damp cloth lifts most of it, and cutting back to a single low-residue cleaner keeps it from returning.
Dullness without soil is a different conversation. When the pattern is intact but the shine is gone in traffic lanes, the wear layer has likely taken years of abrasion, and no cleaner restores a surface that has physically worn. A flooring professional can tell you whether a repair is realistic.
Moisture damage announces itself with geometry. Edges that lift, planks that crown, seams that stay swollen days after cleaning all point to water in the core. Stop wet methods on that area immediately, dry it with air movement, and trace the source, which may be a slow leak rather than your mop. Dark staining near a bathroom threshold, an exterior door or a dishwasher deserves a leak check before anyone deep cleans.
Cleaning can fix soil and residue. It cannot fix a swollen core or a worn wear layer, and more water on either one only raises the cost of the eventual repair.
Manufacturer care guides treat humidity as a two-sided risk. This laminate care guide identifies high humidity as a contributor to swelling or buckling and very low humidity as a cause of gaps, recommends monitoring indoor relative humidity with a hygrometer and adjusting it seasonally, and warns against bleach, ammonia, wax, polish, strong alkaline cleaners and solvents on specified products. It also stresses vacuuming or sweeping before any moisture touches the floor, because grit scratches the wear layer.
The triage rule I'd give a homeowner: run one dry pass, then one barely damp pass over a small area. If the look doesn't improve, stop adding water or product and get a flooring professional's opinion. New homes in HOA communities around Dallas and Hiram often come with laminate in the main living areas, and post-construction fine dust settles into seams before anyone moves in, so a dry-first pass pays off twice there.
Book a Free Estimate for Your Laminate Floors
A professional cleaning estimate can help you decide whether a laminate floor needs routine care or a more detailed reset. Consider requesting one if you have limited time, cannot identify the product's care instructions, or notice changes that might indicate moisture damage. Swollen seams and lifted edges need assessment before more water or cleaning solution is applied.
Maid in America provides one-time and recurring cleaning with natural, low-odor products. The company is licensed, bonded and insured, and its cleaning solutions avoid chlorine bleach, ammonia, abrasives, phosphates and phthalates. Estimates and scheduling are based on the home's details and your priorities, so describe the floor's condition and any products you have used.
Floor care is part of the cleaning service. In the Clean phase, cleaners handle high and low dusting, hand dusting and wiping, washing and scrubbing, dry shine and polish, vacuuming, and mopping with a solution suited to the flooring. Top-to-Bottom Deluxe Cleaning provides detailed top-to-bottom care for first visits, seasonal resets, special occasions, and homes that need more than routine maintenance.
Maid in America serves Kennesaw, Acworth, Marietta, Woodstock and Cartersville, along with nearby communities across Cobb, Paulding and Bartow counties. To discuss your laminate floors and schedule, visit maidinamericaga.com or call 770-427-4448. The estimate review guide for East Texas homeowners is about remodeling estimates, not Maid in America's cleaning process.
A good laminate clean depends on controlling moisture, not increasing scrubbing force. Before booking, note where the floor looks dull, sticky or swollen and share what you know about its care instructions. Maid in America can discuss whether cleaning suits the floor's condition and what the service includes. Visit Maid in America or call 770-427-4448 to talk through your floors and schedule.




Maid in America provides reliable, personalized cleaning with natural products for homes, offices, and communities across West Georgia. Licensed, bonded, and insured, we’re locally and privately owned.
Get in touch with us today!
info@maidinamericaga.com